
TB 2300-420-20-1
PARKING BRAKE CONTROL ASSEMBLY REPLACEMENT (FRONT ONLY OF TWO-PIECE)-Continued
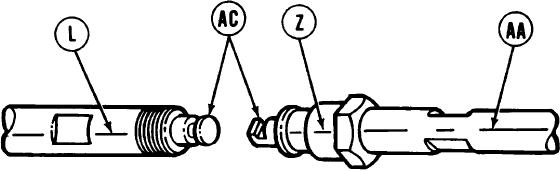
10. Using an adjustable wrench, hold control assembly (L) at flats, use 7/8 inch combination wrench to loosen
disconnect nut (Z) on control assembly (AA).
11. With shift lever in P (park) position, manually move bellcrank at top of transmission to the N (neutral) position (turn
clockwise).
NOTE
This will force the two control assemblies (L and AA) to open up at the disconnect point.
12. Manually disconnect the inner pushrod (AC) of the control assemblies (L and AA) and displace rear control.
13. Attach 15 feet of safety wire to shift lever end of control assembly (L) located inside driver's station. Make sure
safety wire is wrapped several times around end of control assembly.
NOTE
Once safety wire is attached to control assembly, mechanic in driver's compartment should
position himself in turret near bulkhead.
14. Mechanic in engine compartment grasps control assembly with both hands and pulls toward rear of tank, while
mechanic inside turret makes sure that control assembly and safety wire feed through hole in bulkhead and tube.
Insure that retainer slides freely off control assembly and free end of safety wire; secured to a wrench or
unmovable object when free-end is visible beyond ammunition racks. The wrench will not allow free-end of safety
wire to pass through bulkhead.
15. When control assembly (L) is clear of tube located behind fuel tank, mechanic in engine compartment should
disconnect safety wire from control assembly and remove front control assembly from tank.
NOTE
Make sure safety wire is secured to a wrench or other object so that safety wire will remain in tube
for installation of new front control assembly.
TA173276
38