W T E C I I I E L E C T R O N I C C O N T R O L S T R O U B L E S H O O T I N G M A N U A L
0011 00-29
4–1.
CHECKING OPENS, SHORTS BETWEEN WIRES, AND SHORTS-TO-GROUND
(Use Digital Volt/Ohmmeter J 34520-A and Jumper Wire Set J 39197)
NOTE:
Please refer to Paragraph 3–5 to begin the troubleshooting process.
1.
Make sure all connectors are tightly connected and re-check the circuit.
2.
Disconnect and inspect all connectors.
3.
Thoroughly clean corroded or dirty terminals. If dirty or corroded terminals are the probable cause of
the problems, reconnect the clean connectors and operate the vehicle normally. If the problem recurs,
proceed with Step (4).
4.
Review the WTEC III wire numbering system described in Paragraph 3–4.
5.
If all connectors are clean and connected correctly, determine which wires in the chassis harness are
indicated by the diagnostic code. For example, Code 4112, indicates an open or short-to-ground in
the solenoid A circuit — wires 102-T1 and 120-T4.
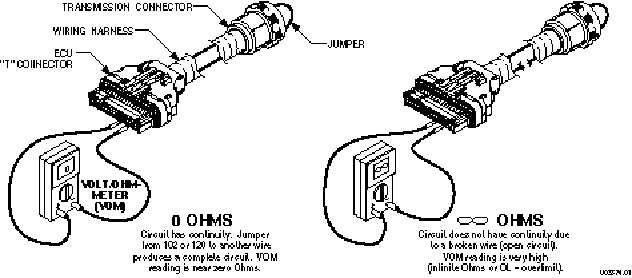
a. Check continuity of wires 102-T1 and 120-T4 by performing the following (refer to Figure 4–1):
(1)
Disconnect the blue “T” connector from the ECU and disconnect the harness from the transmission
main connector. At one end of the harness, using jumper wire kit J39197 and connector probes in
J39775-CP, connect wire 102-T1 and 120-T4 to each other, being careful not to distort the termi-
nals. Jumping the wires together creates a circuit between wires 102-T1 and 120-T4.
Figure 4–1. Open Circuit
CAUTION:
The cleaning solvent must not be chlorine based, contain petroleum distillates, or
conduct electricity. The cleaning solvent should evaporate quickly to prevent the
possibility of condensation within the connectors. Always blow or shake any excess
cleaner from the connector before assembling it to its mating connector or hardware.
SECTION 4 — WIRE CHECK PROCEDURES


