
TB 9-2320-360-13&P-1
A/C RECEIVER/DRYER REPLACEMENT - CONTINUED
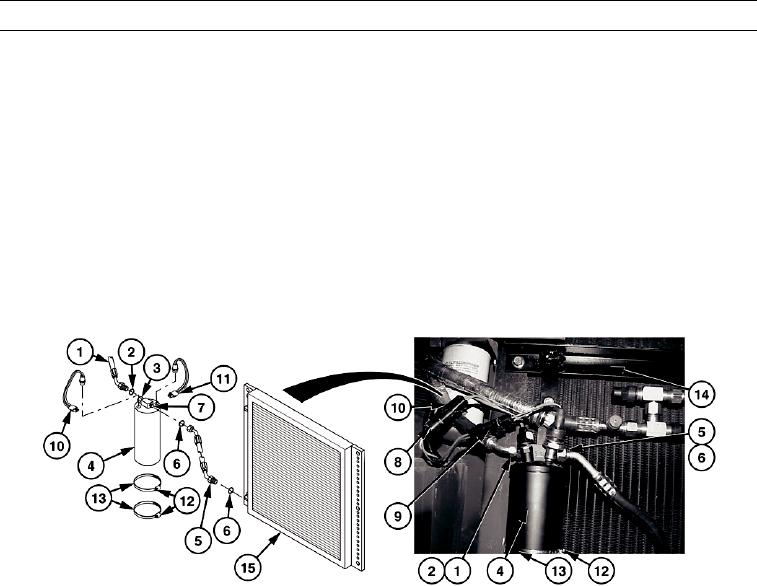
0054 00
REMOVAL
N OT E
Tag and mark hoses prior to removal.
Tag and mark all wires prior to removal.
1.
Remove #6 A/C hose (1) and #6 O-ring (2) from fitting (3) on A/C receiver/dryer (4). Discard O-ring.
2.
Remove #6 A/C hose (5) and #6 O-ring (6) from fitting (7) on A/C receiver/dryer (4). Discard O-ring.
3.
Disconnect two A/C compressor-receiver/dryer harness connectors (8 and 9) from A/C high pressure switch (10) and A/
C binary switch (11) on A/C receiver/dryer (4).
4.
Loosen two screws (12) on clamps (13) and remove A/C receiver/dryer (4) from condenser assembly mount (14).
5.
Remove #6 A/C hose (5) and #6 O-ring (6) from A/C condenser (15). Discard O-ring.
HETF00491
INSTALLATION
1.
Position A/C receiver/dryer (4) in clamps (13) of condenser assembly mount (14). Do not tighten.
2.
Lightly coat three new #6 O-rings (2 and 6) with refrigerant compressor oil.
3.
Install #6 hose (5) and #6 O-ring (6) on fitting (7) on A/C receiver/dryer (4).
WAR N I N G
Adhesives and sealing compounds can burn easily, can give off harmful vapors and are harmful to skin and
clothing. To avoid injury or death, keep away from open fire and use in well-ventilated areas. If adhesive or
sealing compound gets on skin or clothing, wash immediately with soap and water.
4.
Apply sealant to #6 A/C hose (5) fitting.
N OT E
Ensure hose is installed in eleven o'clock position.
5.
Install #6 A/C hose (5) and new #6 O-ring (6) on A/C condenser (15).
6.
Install #6 A/C hose (1) and new #6 O-ring (2) on fitting (3) on A/C receiver/dryer (4).
7.
Tighten screws (12) on clamps (13).
0054 00-2

